By Karl Rosencrants
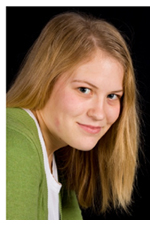
One thing we all dream about having is porcelain smooth skin. That is, for the models on our design layouts! Here is a great technique for giving any model that “movie star skin” makeover that doesn‘t require hours with the clone stamp and healing brush.
Here is an example of an image for an ad layout. Although the model looks good, we are looking to give the model a smoother complexion.
The first thing to do is duplicate the background layer. Run a filter on the newly created layer – Filter -> Blur -> Surface Blur. The settings you choose will depend on the resolution of your image, but you‘ll want to blur the image until you can no longer see the individual pores and inconsistencies in the skin texture.
In this case, I used a radius of 11 pixels and a threshold of 10 levels. Click OK.
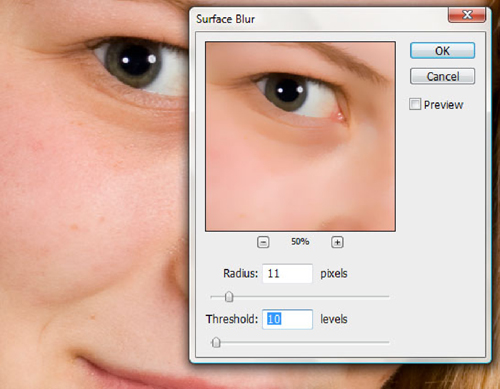
You will notice that we now have blurred the entire image — not just the model‘s skin — so it looks pretty bad. A simple layer mask will help here.
Open up the channels palette. Click through the Red, Green and Blue channels and find the channel which offers the greatest contrast between the background and the face‘s skin. In this image, the Red channel gives us the best contrast. Holding CTRL (PC) or CMD (Mac), click on the thumbnail of the chosen channel, and you will load the luminosity of that channel. We will use that selection to create our layer mask.
Head back over to the layers palette and select the blurred layer. Click the “Add a layer mask” icon.
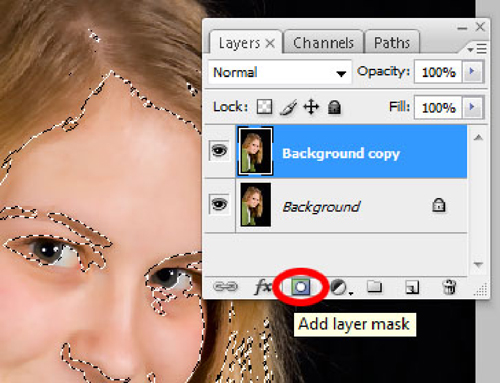
This will create a new layer mask that looks like a black and white version of the image. If you hold ALT while clicking on the thumbnail of the layer mask, you will view the layer mask. Now, press CTRL + L (PC) or CMD + L (Mac) to make a levels adjustment to the layer mask. You will want to adjust the levels until you get a good definition between the face and the background, as in the example shown. Keep in mind that whatever is in white will be blurred and everything that is in black will not.
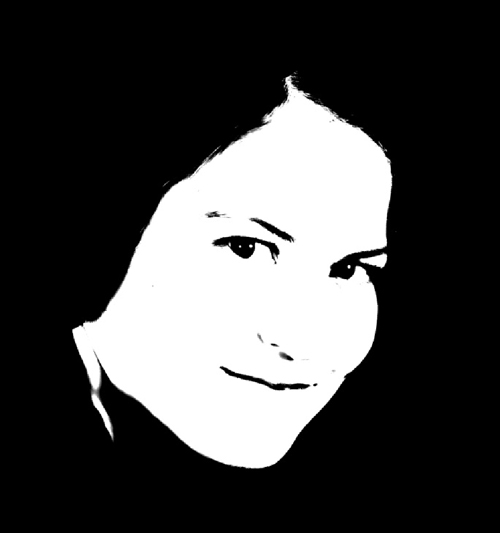
With a brush, black out all the other areas that you don‘t want blurred, such as the hair, shirt and anything else in the background. You‘ll want to make sure the eyes, mouth and edges of the nose stay black so those areas aren‘t blurry. The layer mask should look something like this:

By ALT clicking on the layer mask, you‘ll hide the mask and show the blurred layer again. At this point, you‘re done!
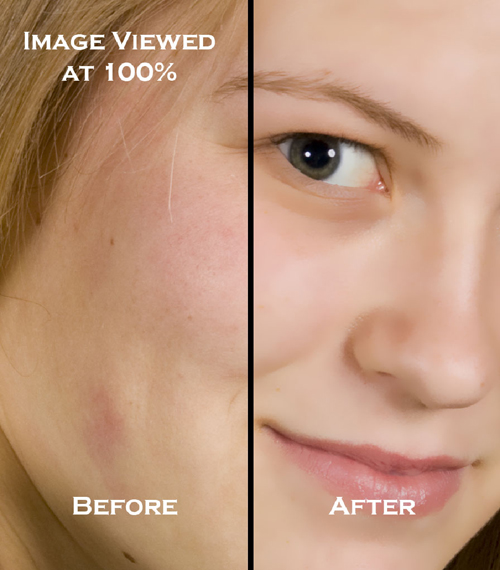
You may choose to go back and do a little more painting on the layer mask to touch up the blurred areas around the eyes, mouth or edges of the face if they look like they need it. Also, if the effect seems a little too strong, reduce the opacity of the blurry layer and allow some of the background layer to show through. Going back down to 70% opacity still gives a nice, smooth look to the skin without making the skin appear porcelain.
This process might sound complicated at first, but once you have done it once or twice, you will find it is a very easy method of giving skin a complexion anyone would be proud of.
This tutorial comes from Shutterstock’s Graphic Design Tips and Tricks page.
