A Photoshop tutorial by Art Director and founder of Pureworks, Victoria Jordan. Post was revised/updated on February 4th, 2014, by Cristin Burton.
In this tutorial, we’ll you show you how to create animated gifs. If you’re tasked with creating web banners, this is a great place to start. An animated gif can be submitted to most ad hubs just as a jpeg can be.

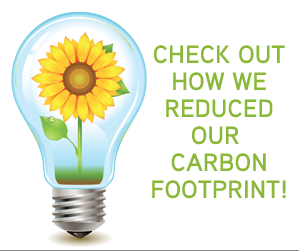
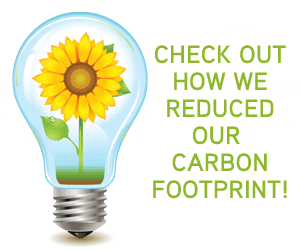
Let’s say you’re asked to create a banner campaign to promote your company’s green initiatives. The first thing you should do is find a Bigstock image good enough to help save the world. Most ad hubs limits on weight (K size) so we’re only going to use one image for our banner.
To maintain a low K size, it helps to have fewer colors, and vectors tend to have fewer colors. So we’ll start with this earth-saving eco-friendly lightbulb vector by Bigstock contributor Krasa.

After selecting our image, let’s create a new document in a standard size for a web banner in Photoshop. We’ll use 300 x 250 for this example. Let’s place our image into its own layer in the new document. (When you create animated gifs in Photoshop, it’s all about the layers, as you’ll see.)
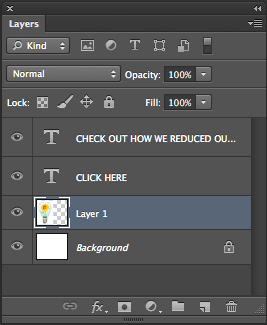
Now let’s add some text. Put each phrase you’d like to include on its own layer.

Now open the Timeline toolbar under the menu Window > Timeline. (In pre-CS6 versions of Photoshop, it’s called Animation.)
The animation window will show up at the bottom of your screen. This method of creating animations is based on frames. Similar to a flipbook, a sequence of frames creates the illusion of motion. Lucky for us, Photoshop only requires that we create a few specific frames, between which the program will fill the gaps.
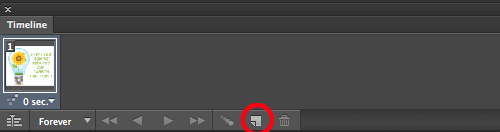
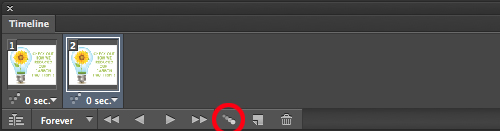
The first thing we need to do in the animation frame is to create our frames. For this tutorial, we want one that features our “Check out…” verbage and another that features our call to action “Click Here”. We already have one frame, so to create the second, let’s click on the duplicate button.
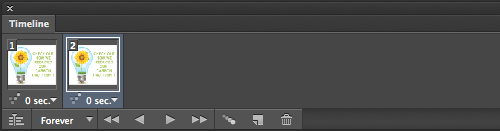
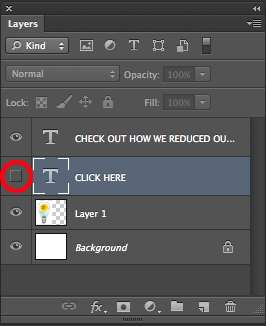
Let’s return to the first frame and turn on the layers we want to show for the first frame of the animation. Hide the “CLICK HERE” layer by toggling the little eyeball off.

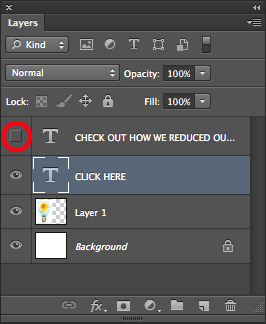
Now, we’ll go to the second frame and do the same thing. We’ll toggle the “CLICK HERE” layer on and the “CHECK OUT HOW WE REDUCED OUR CARBON FOOTPRINT” off.

Now, we need to create the movement between the two frames, so we’ll select both frames by holding down the Shift key, and click the Tweens Animation Frames button in the dialog box. (Tweens create a smooth animation between frames.)
The dialogue box that comes up will look like this.
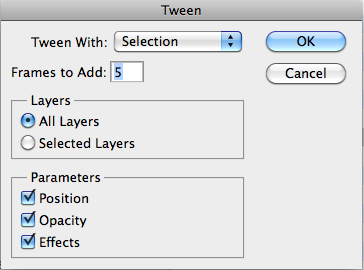
Where it says Frames to Add the default is 5 frames, which is pretty standard, though you can increase it if you like. Keep in mind though, that every frame you add, will add weight to your final animation. Other variables in this dialog are the Parameters. Let’s say I had “Click Here” on top of our light bulb image in the first frame, and to the right of it in the second frame, if the Position box is checked, Photoshop will tween the movement (ie. Created the frames in between one position and the next).
The same concept applies to the Opacity and Effects boxes as well. For this tutorial, the layers we want to animate have the same position, opacity, and no effects, so we are only worried about visibility of the layers. Therefore we’re going to just hit ok because all we want is for one line of copy to fade out and the next to fade in.
Here are our new frames.
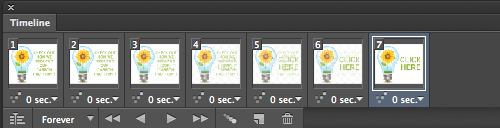
And here is one of the middle frames that Photoshop created. See the one frame fading out as the other fades in? It’s magical!

If you preview by pressing the play button on the Timeline window, you’ll see that when the animation reaches the last frame, it will awkwardly jump to the first frame, which no transition or tweening. So the next step is to create the tween that will lead us back to our first frame. Duplicate the first frame by doing an Option-drag (alt-drag on a PC) and dropping it at the end of the animation. Then select the last two frames, and hit the Tween button again. In the dialogue box click ok to create five more frames.
Now we have 13 frames that cycle through quickly so we have to tweak the timing so our ad is readable. Let’s select the two frames we need users to read by holding down the Command key (Control on a PC). By first clicking the drop down on one of those frames, select 2.0 to change the timing on both of the selected frames to two seconds.

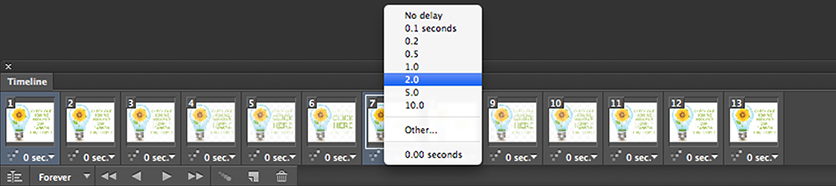
Now set the last frame time to No Delay (because it will lead right back to the 1st frame, which is the same, when the animation loops). Make sure not to delete it though, because it will become the end frame of your animation after the looping finishes. Hit the play button to preview, and see the earth-saving magic unfold before your eyes.
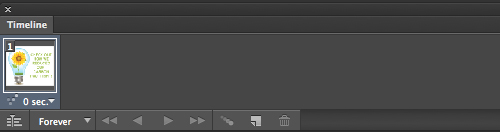
Under the first frame in the Timeline window, there’s an option that reads “Forever”. This is where you set the amount of loops you’d like the animation to make. Three loops seems to be standard for most ad hubs, but definitely make sure to check the specs of wherever this ad will be served. Many ad hubs have a time limit. Once you set your loop, you can go to File > Save for Web & Devices in the menu, and in the dialogue box, you can optimize your gif. First, make sure that “gif” is selected in the drop down menu. In the upper right hand of the dialogue box, click the pull down menu and select Optimize to File Size, and enter the K size that satisfies your specs. There are other settings in this dialogue box you can toy with if the quality and K size are not up to your standards.

If you open the saved gif in a browser, you’ll see how it animates and you’ve created a gorgeous green animated banner!
This post was updated on February 4th, 2014, by Cristin Burton.
RELATED POSTS: