If you need to create a photo for an action-packed advertisement, or an explosive blog post, a muzzle flash effect can come in handy. This Bigstock video clip illustrates the motion, trail, and illumination of a fired gun, to give you a better idea of how to portray this effect in a single, exciting image.
There are two simple ways to add a muzzle flash effect in Photoshop. This blog post will walk you through the process so that you can start creating special photo effects worthy of any action movie poster in a matter of minutes.
Step 1: Find the Right Tools
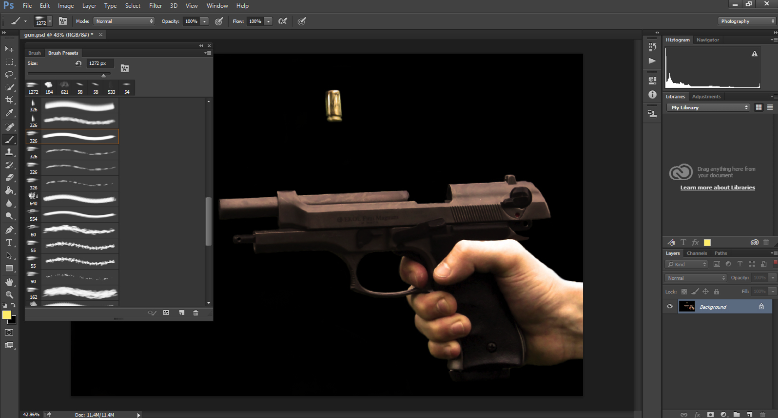
The best way to create a realistic muzzle flash is to download a good flame brush. Search for brushes that create fireballs of various sizes and lengths. For most firearms, longer spurts of flame work best, but sometimes rounded explosions work, too. Just avoid those brushes that resemble candle flames. Since gunfire is an explosion, you’ll want to make sure the flash indicates both force and forward motion.
Step 2: Draw the Flash
Create a new layer to begin drawing the muzzle flash. Select your favorite flame brush, and choose an appropriate size. You’ll also want to make sure that the brush supports transparency—that is, the outer edges of the burst of flame should be slightly transparent so that the background image shows through. If your brush doesn’t have soft or transparent edges, you can always make the edges transparent with a quick layer mask.
Once your brush tool is set up, draw the muzzle flare in front of the gun’s barrel. Don’t worry about getting the flare perfectly aligned on your first try—you can always move and resize the layer later.
An Alternative Way to Create Muzzle Flash
If you can’t find the perfect brush, another option is to use the muzzle flash from another photo—one of your own, or a royalty-free stock photo found online. This method is easier than the brush method, but if you can’t find the perfect image, the results may not be as nice as a hand-drawn flare.
To use a muzzle flash from another image, simply import the image as a new layer. Then use the layer-masking tool to remove everything but the flash itself.
Here’s how …
- Select the new layer.
- Click the Layer Mask button at the bottom of the Layers palette.
- With the mask selected, use a black brush to remove everything in the layer but the flash itself.
You may want to experiment with shades of gray around the edges of the flash to give it some transparency.
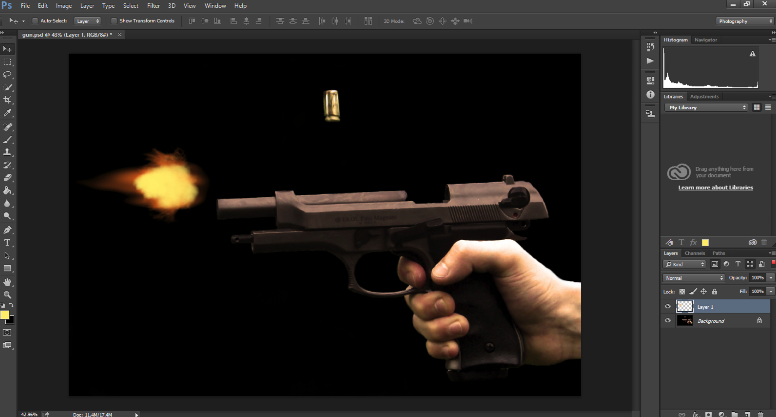
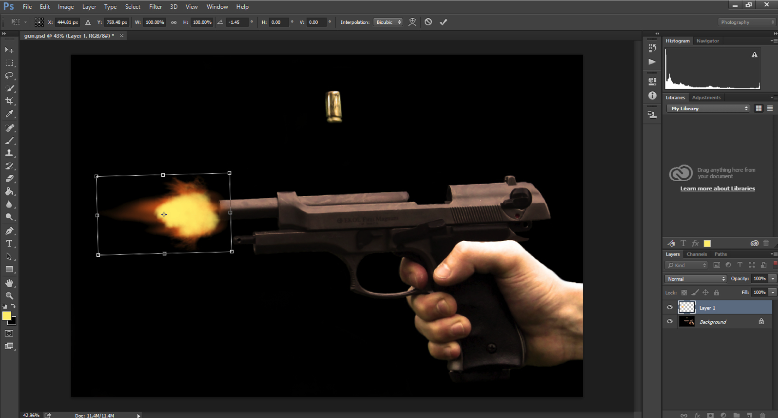
Step 3: Align the Flash
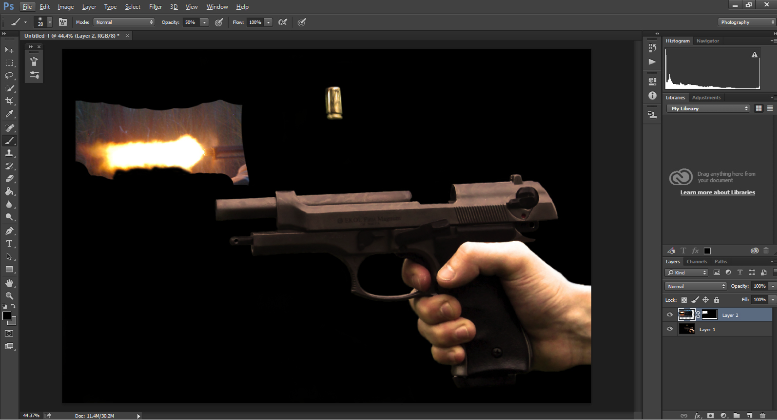
No matter which method you choose to create the muzzle flash, the alignment process is the same. Start by positioning the flash over the gun’s barrel, and resize as necessary. If the firearm isn’t perfectly horizontal within the image (if it’s pointed towards the front or the back of the frame), then use the perspective alignment tools to make sure the flare points in the same direction as the gun.
To access the alignment tools:
- Select the Move tool in the Tools panel.
- In the Options toolbar, click “Show Transform Controls.”
- As you hover your mouse over the selected flash layer, you’ll have options to move, transform, and rotate the layer.
To transform the flash layer (change the perspective):
- Hover over a corner of the layer so that the cursor becomes a diagonal arrow.
- Click and drag to move that corner of the layer.
If you need to rotate the layer, place the cursor outside of the selected area so that a curved arrow appears. You’ll then be able to rotate the layer in any direction you choose.
Step 4: Finishing Touches
For a completely realistic finish, it’s important to remember that the muzzle flash will illuminate objects close to it—the gun’s barrel, and maybe the hand of the person holding it.
To add highlights in all the right places, select the Dodge tool. Under the Range options, choose Highlights to lighten the brightest areas on the gun or the hand holding it. If necessary, the Midtones and Shadows settings will brighten the darker areas, but use these settings with caution. On a black or dark object, these settings can result in a gray, faded look.
Whether you use the Highlights, Midtones, or Shadows settings, make sure to set the Exposure percentage low. A few careful passes at low exposure is less likely to cause gray patches. You should also use a soft-edged brush so that your highlights blend with the rest of the image naturally.
If desired, you can add gun smoke to the image. Start a new layer and use a smoke brush to paint clouds or streams of directional smoke, like in this image. Just keep in mind that a gun doesn’t make long vertical ribbons of smoke until after it has been fired. Any smoke that you’d normally see around a firing gun will either be horizontal or it will have a misty look.
Step 5: Save Your Work

Once you’ve perfected the muzzle flash, smoke, and any other effects, save a copy of the image with the layers preserved. Then you can flatten the layers and export the file as a JPEG for web use, or any other purpose.
This method is great for not only muzzle flashes, but also for any other highlights you’d like to add. Place bursts of light on glittering objects or create your own explosions. However you decide to use this technique, it’s sure to add an element of excitement and action to your images. Fire away!
Header image by Bigstock contributor Stokkete.
RELATED POSTS: